Guard
Guard의 역할
Guard는 lifecycle에서 middleware 다음인 3번쨰에 위치 합니다.
사용자가 요청을 보냈을 때 사용자가 인증된 요청을 보냈는지 확인해야할 필요가 있습니다.
그래서 api를 요청할 때 토큰을 보내거나 로그인을 하거나 합니다.
우리는 api를 요청한다고 가정하고 header에 authorization에 Bearer hellow가 있는지 확인해보겠습니다.
구현
- main.ts에 swagger 내용추가
typescript
private swagger() {
  const config = new DocumentBuilder()
    .setTitle('NestJS API')
    .setDescription('NestJS API description')
    .setVersion('1.0')
    .addTag('nestjs')
    .addBearerAuth()
    .build();

  const document = SwaggerModule.createDocument(this.server, config);
  SwaggerModule.setup('docs', this.server, document);
}- header.guard 생성
project/
├── lib/
│ ├── auth/
│ │     └── header.guard.ts
│ └── lib.module.ts
위에 처럼 lib 폴더와 module을 생성하고 auth 폴더 밑에 header guard를 생성하세요.
앞으로 많은 것을 lib에서 생성할 것입니다.
typescript
import { Injectable, CanActivate, ExecutionContext } from "@nestjs/common";
import { Request } from "express";

@Injectable()
export class HeaderGuard implements CanActivate {
  canActivate(context: ExecutionContext): boolean {
    const request = context.switchToHttp().getRequest() as Request;
    const authorization = request.headers?.authorization;
    const authorizationSplit = authorization?.split(" ");
    const token = authorizationSplit?.[1];

    if (!token || authorizationSplit?.[0] !== "Bearer" || token !== "hellow") {
      return false;
    }

    return true;
  }
}
Guard는 CanActivate 인터페이스 구현합니다.
여기서 ExecutionContext 관해서는 공식문서에 좀 더 자세히 나와 있습니다.
간단히 설명하자면 아래와 같습니다.
typescript
/**
 * microservice에서 사용합니다.
 */
switchToRpc(): RpcArgumentsHost;
/**
 * http에서 사용합니다.
 */
switchToHttp(): HttpArgumentsHost;
/**
 * 웹소켓에서 사용합니다.
 */
switchToWs(): WsArgumentsHost;
우리는 http 요청이고 express를 사용하니까 그에 맞게 type을 지정해줍니다.
return이 false면 인증이 실패하고 true이면 인증에 성공하게 됩니다.
- guard 바인딩 guard는 lifecycle에서 설명되었듯이 3가지 수준에서 바인딩이 가능합니다.
- Global guards
typescript
const app = await NestFactory.create(AppModule);
app.useGlobalGuards(new RolesGuard());- Controller guards
typescript
@Controller("cats")
@UseGuards(RolesGuard)
export class CatsController {}- Route guards (제가 구현안 예시의 코드)
typescript
@ApiBearerAuth()
@ApiCreatedResponse({
  description: '생성된 고양이를 반환합니다.',
  type: CatsDto,
})
@ApiOperation({
  summary: '고양이 생성',
  description:
    '이 API는 새로운 고양이를 생성합니다.<br/>고양이의 이름, 나이, 품종을 입력하세요.',
})
@UseGuards(HeaderGuard)
@Post()
create(@Body() createCatDto: CreateCatDto): CatsDto {
  return this.cats;
}- 요청
 이제
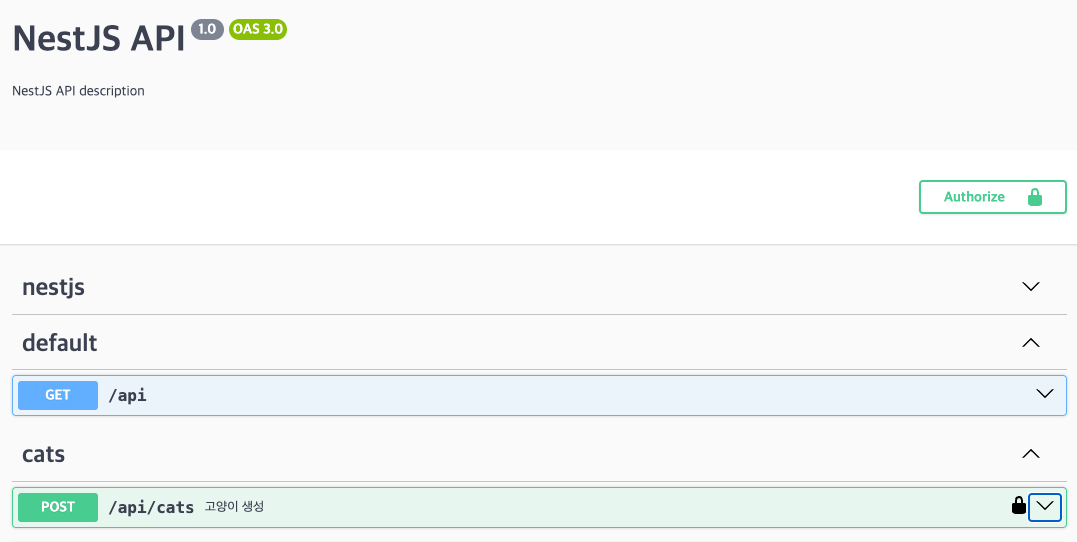
이제 localhost:3000/docs로 들어가면 상단에 Authorize가 생긴걸 볼 수 있습니다.
Authorize를 클릭하고 hellow를 입력한 뒤 Authrize를 클릭!
그리고 고양이 생성 api를 요청해보면 인증이 잘 되어서 값이 리턴된 것을 볼 수 있습니다.
만약 입력하지 않거나 잘못된 토큰을 입력한다면 아래와 같은 응답을 받을 수 있습니다.json{ "message": "Forbidden resource", "error": "Forbidden", "statusCode": 403 }
정리
Guard는 이런 요청 뿐만 아니라
Passport를 이용한 JWT등 각종 인증, 사용자 권한 관리 및 어떤 요청에 관한 것이든 원하는데로 인증과정을 구현할 수 있습니다.
이번엔 간단한 인증을 구현했지만 나중에 데이터베이스를 연결하여 진행하면 좀 더 복잡한 인증과정을 구현해보도록 하겠습니다!